


FeatureNew
Uploading with DeepMeta
Uploading to Getty Images / iStockphoto with DeepMeta 4

By Franky De Meyer
In this post we explain the fully reworked upload section of DeepMeta. We listened to your feedback and now present a solution that works optimally on both large desktop screens and mobile.
The upload process typically starts with creating a new submission batch, so let's start with the Batch list:
Batch list & create
From the main menu: select Batches & Uploads. The list of your current submission batches is shown:

At the top right are the "Sync" and "Create Batch" buttons:

DeepMeta keeps your Batches and Uploads up to date automatically: the server checks the Getty ESP site in the background as long as you've opened this page or Inspections in the last two weeks, and also right away when you open this page. So there's no need to click Sync. The Sync button is there for when you want an instant sync, e.g. right before you check or continue a batch at the Getty ESP site. The icon spins while a check is running, and its tooltip shows when your batches were last checked. A Sync is a two-way sync: it also sends any local edits that haven't reached the Getty ESP server yet, and your changes in DeepMeta take precedence over changes made at the Getty ESP site.
Click the button to open the "Create Batch" popup window and fill out the form with info for the new Batch to create. Then click the Create Batch button to confirm, or Cancel to close the popup without creating a new Batch.

| Type | Dropdown to select which ESP account and asset type to use (e.g. iStock - Creative Photo, Getty - Editorial Video). | |
| Name | Required. The name of the batch as shown in the batch list. | |
| Notes to inspectors | Optional. Notes visible to Getty inspectors when reviewing your submissions. | |
| My private notes | Optional. Your own private notes — not sent to Getty. For your own reference or for communication with an Assistant. | |
| Brief ID | Optional Brief ID to link the batch to a Getty Brief. For editorial batches, this field is labelled Event ID instead. | |
| Deadline | Optional deadline for the batch, in your local time. For your own reference or for communication with an Assistant. | |
| Auto-submit | Optional. Schedule automatic batch submission on a future date. See the DeepMeta - Auto Submit blog post for details. |
Batch info & edit
While still on the Batch list, click the button at the right side of a closed batch in the list to open the Info panel. Active batches have a button instead which opens the Edit panel (see below).

The Batch Info panel will pop up:

The following actions are possible:
| View Uploads | Opens the Upload list for this batch, showing all Uploads for editing or viewing their info. | |
| Collection | Allows adding all accepted Uploads of the batch to a new or existing Collection. | |
| ESP | Opens the Getty ESP page for the batch in a separate tab in your browser. | |
| Delete | Deletes the batch, both in DeepMeta and at the Getty ESP site. Only active batches can be deleted. Attention: Since this is a destructive action, confirmation will be asked. Use with Caution! |
At the top is a switch to toggle between View and Edit mode. When a batch has been closed by Getty (lock icon), editing is disabled.

Switching to Edit mode results in the following Batch Edit form. See the Batch Creation section above for info on all the fields.

Uploading files
To upload files to the Getty ESP server, open the Upload Panel by clicking the button at the top right of the DeepMeta web page. This button is available on all pages of the website. This means you can keep navigating the site while uploads are ongoing and initiate new uploads or check their status at any time from any page.

If no batch is selected: select one from the dropdown list. Only active batches - eligible for uploading - are shown in the list.

The Create batch button is also available on the right-hand side of the batch selection list, allowing you to create a new batch on-the-fly.
Once a batch is selected, the Select Files button is shown. It will open your browser's "file select" dialog, allowing you to select one or more files from your local system to upload. Alternatively, you can use drag & drop to add files.

As soon as the files have been selected, the upload to the Getty ESP server starts. You can now close the Upload panel and re-open it at any time to see the progress of the upload process. You can already start editing / keywording the uploads now: your edits are sent to the Getty ESP server automatically once the uploads have finished.

While uploads are ongoing, the upload icon at the top right of the page shows the number of uploads currently in progress:

Multi-account
If you have linked multiple ESP accounts, e.g. one for iStockphoto and one for Getty Images, you can simultaneously upload to both. For instance, select an iStock batch for your first group of uploads and once started, select a Getty or other iStock batch for the next group of uploads.
Pausing and aborting uploads
To temporarily pause the uploads, e.g. to free up your internet connection for other things, click the Pause button. To abort all ongoing uploads, click the Abort button.

If uploads are ongoing and you attempt to navigate to a different website or close the browser tab, a message will inform you that this will abort the uploads. Click the Cancel button to stay on the site and keep uploading. Click the Leave button to abort uploads and leave the site. You will have to clean up the aborted uploads at the ESP site.

Upload list
While viewing the Batch list, instead of clicking the or icon at the right to view/edit Batch info, click the row itself to show all uploads in that batch: the Upload list.

The top header shows the following info:

| Edit Batch | Opens the Batch Edit pane where you can change the batch name, add notes, set an Auto-Submit date, etc. | |
| Sync | Optional: click for an instant sync of this batch with the Getty ESP server, e.g. right before you check or continue the batch at the Getty ESP site. It also sends all edits that haven't been sent yet, including older ones (see below). This is a two-way sync, where your changes in DeepMeta take precedence over changes made at the Getty ESP site. |
Below the header, a status line tells you whether your latest edits have been sent to the Getty ESP server yet, e.g. "Sending changes to ESP in about 2 min" or "All changes sent to ESP". Uploads with unsent changes show a icon with the number of changed fields. Hover over it to see whether the changes will be sent automatically or need a Sync.
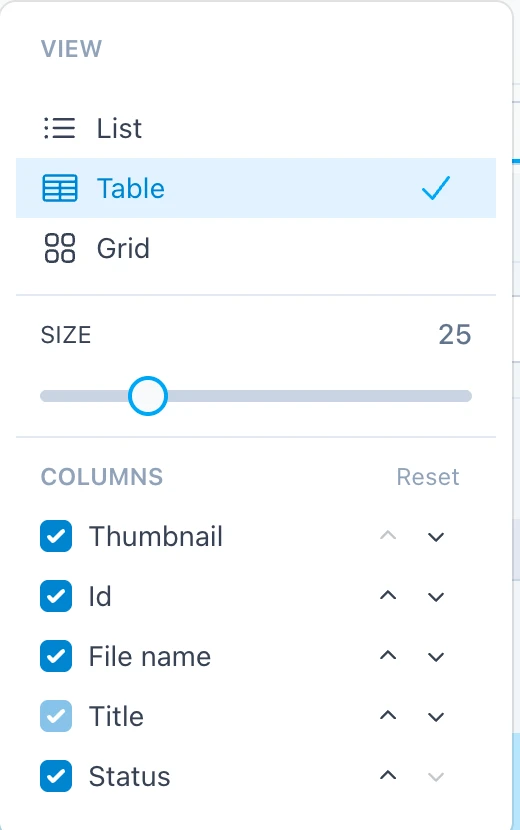
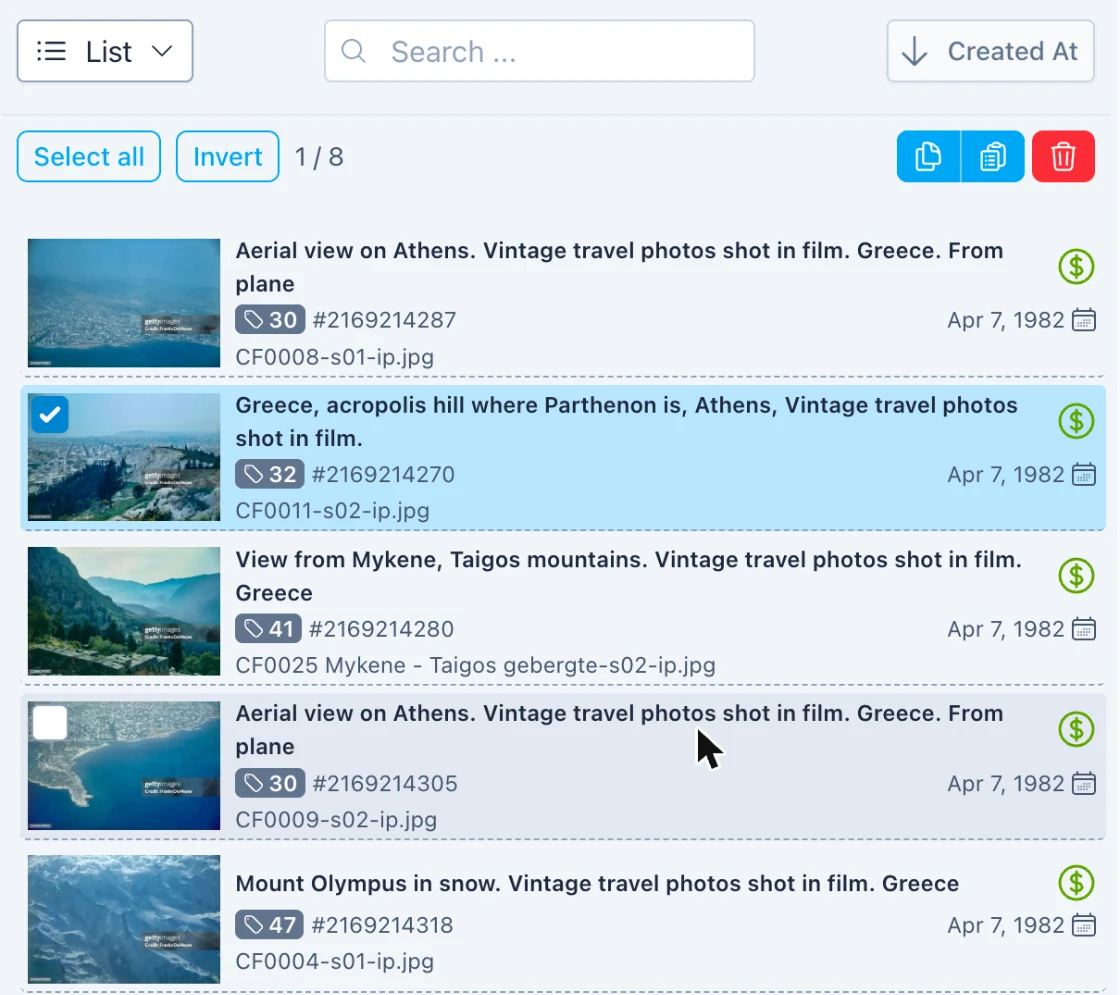
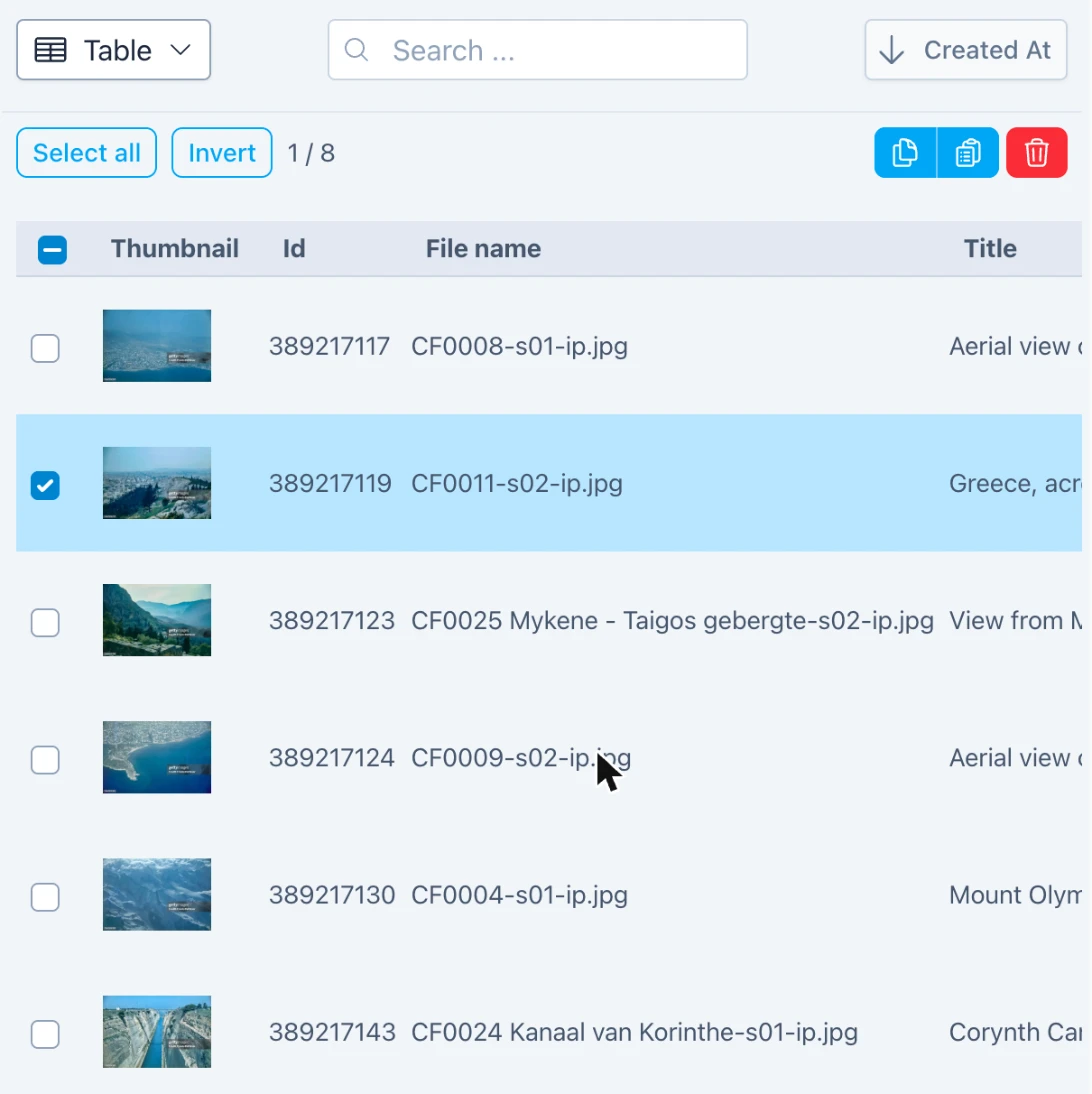
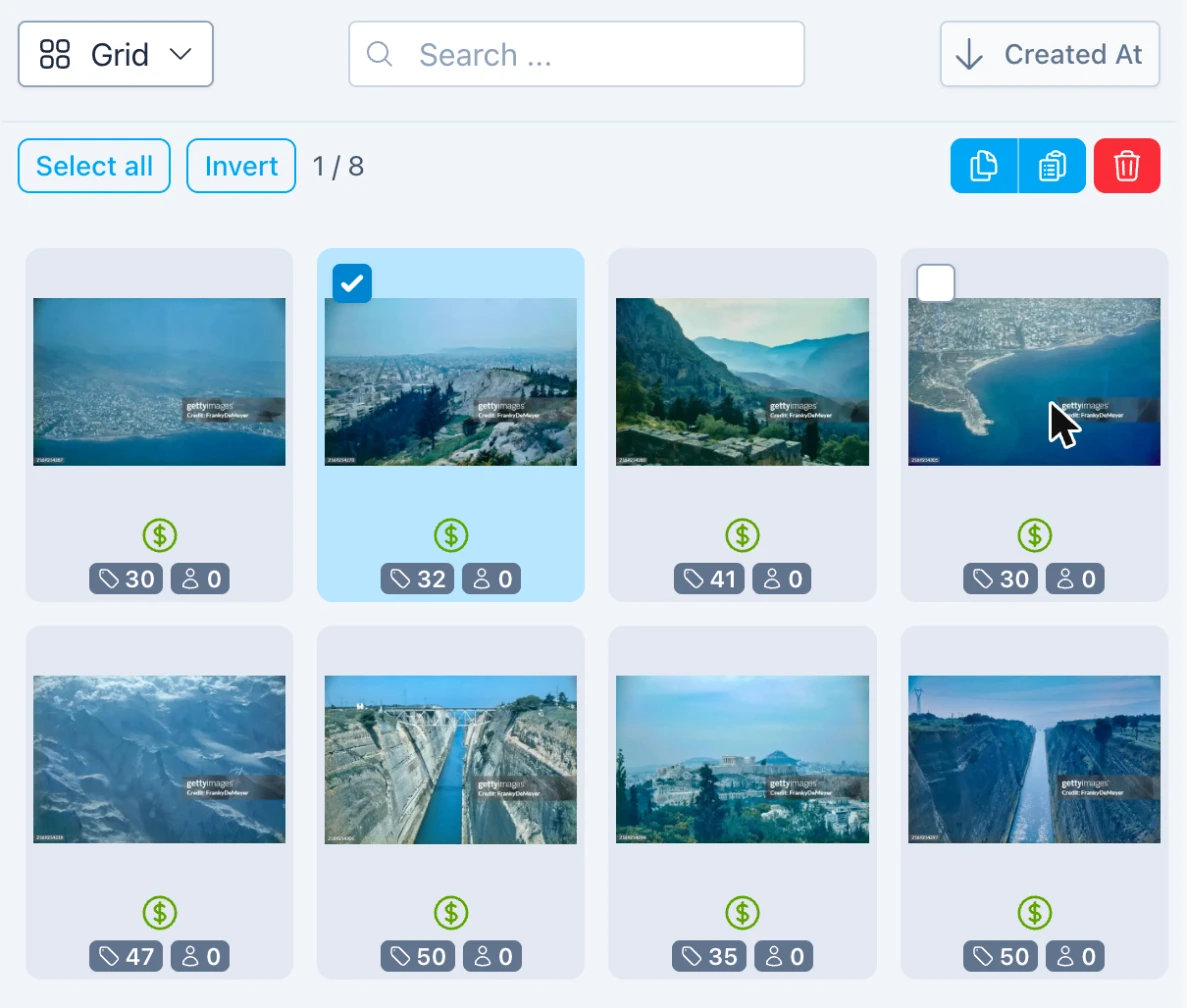
The View Selector at the top of the Upload list allows you to choose between 3 different views of the list: List, Table and Grid. Use the slider to change the size of the thumbnails. DeepMeta keeps track of the size for each of the individual views.
In the Table view, the View Selector also lets you choose the columns of the table: tick or untick a column to show or hide it, and use the arrows to change its position. Reset brings back the default columns. The Title column always stays visible. On a narrow screen, some columns are marked "Wider screens only": they only show on a larger screen.
Click an upload to select it: it gets a blue background. The right-hand edit panel shows the edit panels for the selected upload, in this case with the Keywords tab selected.

To select multiple uploads, use the checkbox in the top-left corner of each upload. On desktop, it appears when you move the mouse pointer over the upload, and stays visible while the upload is selected. In the Table view, the checkboxes have a column of their own. Below are the 3 views with one upload selected and the mouse pointer over another one:
- Click a checkbox to add the upload to the selection, or to remove it.
- Ctrl-Click (or Cmd-Click on macOS) on an upload does the same.
- Shift-Click on an upload or its checkbox selects all uploads from the last one you clicked.
- A plain click on an upload selects only that upload.
- The arrow keys move the selection through the list; hold Shift to extend it. ESC clears the selection.
On mobile and tablets, tap the Select button to show the checkboxes on all uploads, then tap the uploads you want to select. Cancel ends the selection.
Below is an example of the List view with multiple items selected. The right-hand edit panel shows a composite view for the selected uploads, with some keywords fully or partially selected and most unselected.

The Selection header at the top of the list looks as follows:

| Select all | Click to select all uploads in the list (click again to deselect all). On desktop, you can also press Ctrl-A (or Cmd-A on macOS). | |
| Invert | Click to invert the current selection. | |
| 2 / 16 | Currently, 2 of the 16 uploads in the batch are selected. | |
| Copy | Click to copy the first selected Upload to the clipboard. On desktop, you can also press Ctrl-C (or Cmd-C on macOS). You'll then be able to paste the Upload's fields to one or more other uploads. | |
| Paste | Click to open the Paste tab, where you choose which fields of the copied Upload to paste to the selected Uploads. On desktop, you can also press Ctrl-V (or Cmd-V on macOS). | |
| Delete | Click to delete the selected Uploads. On desktop, you can also press DEL or Backspace. A confirmation is asked first. Attention: the uploads will be deleted from DeepMeta as well as from the Getty ESP server, so use with caution! |
Upload panels
To make editing as efficient and comfortable as possible, we have spread the Upload metadata across 5 separate panels. By default, these are grouped in a single Tab group, with one panel always selected:
On wider screens:

On narrow screens:

Edits are auto-saved by DeepMeta and sent to the Getty ESP server automatically: normally about 2 minutes after you stop editing, or after about 10 minutes of continuous editing. Uploads that are still running or connection problems can delay this; if files of the batch are still uploading, your changes are sent once those uploads have finished.
Edits older than 7 days are not sent automatically: the status line below the Upload list header then mentions that "Sync now sends them". Click the Sync button for that, or whenever you want your edits sent right away.
Click the icon at the top right of the Tab panel to show the thumbnail. Use + and - buttons to increase/decrease the size. The icon allows you to replace the uploaded file with a new one.

Docking and pinning panels
By default, panels are docked in their respective Tab panels. In the heading of the active Tab, you notice a small pushpin icon:

By clicking a pushpin, you pin the panel on the DeepMeta page, so it remains visible. You could say it escapes its Tab panel. Here's an example where we pinned the Preview panel:

Pinned panels are marked in green and have their own icon to toggle the thumbnail. To unpin the panel and dock it back to its Tab container, click the pushpin again.

If you have an ultra-wide monitor, you can go crazy and pin all available panels:

You can drag the panel separators to resize the panel widths:

Mobile
When viewed on a mobile device, the DeepMeta Batches & Uploads user interface is tailored to the limitations of working on a narrow screen. It allows you to shift between 3 compact screens: Batch list > Upload list > View & Edit panels. Click an item in the list to move to the next screen and use the < Back button to go back one level.

Note that the rest of this document refers to the Desktop experience.
Contextual Toolbar
At the very top right of the DeepMeta window is the contextual Toolbar, showing all buttons that apply to the action you're currently doing. Buttons for actions that don't apply are hidden.

| Undo | Click to undo the last edit. | |
| Redo | Click to redo the last edit. | |
| ESP | Opens the Getty ESP page for the current Batch. | |
| Submit | Opens the Submit panel where you can submit your Uploads for inspection to Getty. | |
| Search portfolio | Searches your whole Portfolio: titles, descriptions, keywords, file names and places. A result's Copy takes its metadata to the Paste panel, and Open batch opens the batch it was uploaded in. |
Upload Preview Panel
With only one Upload selected, the Preview panel is mostly useful for closed batches, where editing is no longer allowed.

With multiple Uploads selected, the thumbnails are shown, auto-sized to fill up the panel.

Upload General Panel
The General panel shows all edit fields relevant to the type of Batch the Uploads are in.

Input fields with errors have a red triangle. If multiple uploads are selected, the triangle shows the number of uploads that have an error for this field. Possible errors are that the field is required but not filled in, or that the field contents have the wrong format.
When multiple uploads are selected, fields that have different values for different uploads are marked in yellow. Changes to the field contents will affect all selected uploads.

Upload Keywords Panel
Select the Keywords tab to add keywords to the selected uploads. Below is an example for single-select mode:

Click the + button to show the keyword input box. The button changes to an x. Click it again to hide the input box and save vertical space.
Type some keywords in the input box at the top - separated by commas - and press ENTER. In the example we entered: sand, beach, child, middelkerke. For a brief moment, the message "Looking up keywords" appears; this is where DeepMeta contacts the Getty ESP server to look up the entered keywords in the Getty Vocabulary.

After the vocabulary lookup, the right-hand column shows the newly entered keywords in yellow, along with suggested Getty terms to choose from. In the example above, for the keyword Beach, we can select terms Beach, Sand, Swimwear, etc. Click all the terms that apply to the selected upload. They will appear in the left-hand column. It is only the terms in the left-hand column that will be sent to the Getty ESP server.
Keywords & Terms
We use the word Keyword for free-form keywords as they are typed in by the user or imported from the file EXIF metadata. With the word Term, we refer to an official meaning from the Getty Vocabulary. The process of selecting relevant Terms for a Keyword is called "Disambiguation". Here's a link to the official explanation on the Getty website.
Once you've selected all relevant terms for a keyword, you can click the icon on the right-hand side to remove the keyword panel from the right-hand list. You don't have to, but this works fastest, since it moves the next keyword to the top. You can also remove all keywords by clicking the icon at the top of the list.
On desktop, to move faster, you can also use Ctrl-Click (or Cmd-Click on macOS) on a term: it will select the term and remove the panel in one go. You can do this for the last term you want to select in each panel.
If none of the terms shown for the keyword apply - or none are shown - you can click the keyword in the panel header itself - Middelkerke in the example below (a local city name) - to add it to the left-hand 'Candidates' list.

If your uploaded files contained keywords in the EXIF metadata, you don't need to manually type them in, as we showed above. They are extracted from the file and automatically placed in the right-hand column. All that's left for you to do is select the relevant terms: a process called "Disambiguation".
The left-hand Terms column is split into the following sections:
| General | All terms from the Getty Vocabulary chosen by you for the selected upload(s). | |
| Candidates | All raw keywords chosen by you. In our example above, we had entered the keyword `Middelkerke`, which is a small beach town that is not in the Getty Vocabulary. We still want it included with the Upload though, as some Getty customers might search for this specific town. To do this, we clicked on the uppercase keyword `MIDDELKERKE` in the right-hand list instead of one of the terms. These keywords are called "Candidate terms" because they are treated by Getty as possible candidates for inclusion in their Vocabulary. "Candidate terms" are shown in red on the Getty ESP page. They will be searchable by Getty customers, but are not auto-translated in different languages like regular terms are. | |
| Read-only | These are terms that have been automatically assigned by the Getty ESP, based on properties of the uploaded image. Examples are "Horizontal" or "Vertical", based on the detected orientation of the image, "Color image" for images where colour was detected or the name of the country you entered in the "General" tab. You cannot change these terms and they don't count against the keyword limit. | |
| Not accepted by Getty | Only shown when Getty didn't keep some of your terms, with the reason if we know it (e.g. "Not accepted for this asset type"). Click a term to look up alternatives, or click the small x next to it to dismiss it. |
The top of the left-hand column shows the number of terms assigned to the upload, e.g. 5 TERMS. If multiple uploads are selected, the minimum and maximum count over all selected uploads is shown, e.g. 5 .. 15 TERMS.
When multiple uploads are selected, the Keyword Edit panel looks like the example below:

The terms that are present on all selected uploads show a full circle checkbox. Terms only present on a subset of the selected uploads show a half circle checkbox. Click the term to apply to all uploads, and then click again to remove from all uploads. Remember you can always use the "Undo/Redo" buttons to cancel the latest edits.
To find the uploads that have a term, Alt-Click it (or Option-Click on macOS), in either column: the uploads of the batch that have this term get selected. This works for Candidates too.
PANEL COLOURS
- Yellow Newly added panels and terms. These let you easily identify new content after typing in keywords.
- Grey A keyword panel where none of the terms are applied yet. The keyword needs to be "disambiguated".
- Blue A keyword panel where at least one term is applied. You can still select additional terms if you feel they are relevant.
If you want inspiration for appropriate keywords, select the tab at the top of the right-hand column. Two or three sections with suggestions will be shown:

- Keyword suggestions based on the title you entered for the uploads. If no title has been entered yet, this list will be empty, so it's best to enter the title first. You can also type some words in the keyword input box and then click the icon to get suggestions based on those words.
- Visual suggestions based on an AI analysis of the first selected Upload thumbnail.
- Colour suggestions based on the dominant colours of the first selected Upload thumbnail (only shown when colours are detected).
If you want even more inspiration, select the tab to show some "Cue Cards" (cheat notes):

This is a set of hand-crafted themed cards with common terms you can apply, like Age, Positive emotions, Negative emotions, Composition, etc. We plan to expand the categories in the future and even let you define your own.
TIP
Regardless of the selected tab, the right-hand column always contains 'suggestions', stored locally by DeepMeta. They are never transferred to Getty ESP. Only the left-hand TERM list is sent.
Upload Releases Panel
Next up is the Releases tab. Click the icon to upload releases to the batch:

Your browser's "file select" dialog pops up. Select the release file (JPG, PNG, HEIC or PDF) and then fill out the Release form. Depending on the selected type (Model / Property) there will be a different set of fields to enter:

For PDF releases created with Easy Release or the Model Release App (formerly SnapSign), DeepMeta prefills as much of the form as it can (e.g. the type, the model's name and date of birth); check the values before saving. Scanned releases can't be read this way. Otherwise, the name for the release is initialised to the filename. You can change all fields if you like. The filename will still be remembered and shown.
Once a release has been uploaded, it is shown in the list and automatically assigned to the selected uploads. Tick or untick the checkboxes to assign releases to, or remove them from, the selected uploads. Click the icon to view a release, or the icon to delete it. Attention: a deleted release is removed from the Getty ESP server too. In the example below, 2 uploads were selected, the first release is assigned to one of these 2, the second to both.

Upload Paste Panel
Finally, we have the Paste tab. It allows pasting fields to all selected uploads. Fields that have already been pasted, or that are identical to those of the selected target uploads, have their Paste button disabled.

To actually paste the fields, you have 3 options:
- Field-by-field: Click the respective Paste button at the right of each field you want to paste.
- All: Click the Paste all fields button at the top right.
- Selected: Click the Paste selected fields button at the top left. First tick the checkbox for each field you want to paste. The selection is maintained for later, so you can have your favourite set of fields.
To copy metadata from a "source" upload - from the same or another batch - to one or more "target" uploads: navigate to the batch of the source upload, select it in the list and click the Copy button at the top of the list. Next, navigate to the batch of the target uploads, select the desired ones and click the Paste button to activate the "Paste" tab. Then use one of the 3 methods described above to paste some or all of the fields to the selected Uploads.
Note that you can also copy from Portfolio Assets.
TIP
Copy / Paste of Uploads works across different browser tabs/windows. An efficient way to use it is to have one browser tab open to search for Uploads or Portfolio Assets to copy from, and the other tab for the batch you're working on, where you paste the copied data.
Replace File - Revisions
To replace an already uploaded file (JPG, MOV, MP4, EPS, …) with a new one, select that one upload and click the "Replace file" icon on the right-hand side of the thumbnail. This is possible before submitting, or when Getty sends the upload back for revision.

The Upload pane will slide in, allowing you to select the replacement file. Once selected, it is uploaded and replaces the original one.

If you submitted an upload and Getty sends it back for revision, you can use DeepMeta to edit your metadata and/or change/upload releases and/or replace the file itself. When done, submit the revisions with the Submit button (see below), or at the ESP site. If you go the ESP route, click Sync first, so your latest edits are surely there.
Submitting your uploads
To submit all submittable uploads in the current batch: click the Submit button in the Toolbar at the top of the DeepMeta window. To only submit one or a few uploads: first select them and then click the Submit button:

The Submit Panel will slide in, showing an overview of all uploads that will be submitted. Getty prefers all uploads in a batch to be submitted in one go, so if you still have unfinished uploads, you may want to close the Submit panel and finish those first.

Click the Submit 3 Uploads button (the number depends on your selection) to start submission. The progress bar will show the progress. Before and after the submit, a batch sync is automatically performed to make sure both DeepMeta and the ESP server have the same state.
CSV Import
DeepMeta 4 supports importing CSV files with metadata to be applied to your uploads. The format of the CSV files is compatible with Getty ESP import formats (see below), though not all fields are supported yet. There are two ways to use a CSV file:
- Together with your files: the CSV fills in the metadata of the files you're adding.
- On its own, at any later time: the CSV updates the uploads that are already in the batch.
Together with your files
Add the .csv file at the same time as the JPG / MOV / MP4 / MXF / EPS files you're uploading, and the CSV metadata will be applied to those new files.
Here's an example of 3 video files to be uploaded, along with a matching .csv file. The contents of the .csv file are shown in the popup window:

To apply the CSV to the video files: select all the video files + the .csv file when you import them in DeepMeta for upload:

You can see at the bottom of the screenshot above that the metadata in the CSV file has been applied to 3 of 3 files. On the left-hand side you can see the titles already shown.
A CSV added together with files only applies to those new files: uploads that were already in the batch are left alone, even if the CSV has rows for them. That way, you can keep one CSV per batch and add it again with each new set of files, without undoing the edits you made in the meantime.
On its own, for the uploads already in a batch
You can also add a CSV file at any later time, e.g. when you prepared your titles and keywords after uploading. Open the Upload Panel, select the batch and add only the .csv file, with the Select Files button or with drag & drop. DeepMeta then matches the rows of the CSV, by file name, to the uploads that are already in that batch. This also works for uploads you added at the Getty ESP site itself, once DeepMeta has synced them.
Before anything is changed, DeepMeta asks for your confirmation and tells you how many uploads will change, and how many of them will get their keywords replaced. Once you confirm, the changes are applied as one single edit: one click on the Undo button in the toolbar takes them all back. The changes are sent to the Getty ESP server automatically, like any other edit. While DeepMeta applies the CSV, the page is briefly locked, so your edits can't get mixed up with the CSV's.
The CSV panel then shows the result: how many uploads were updated, and, if any, how many were already up to date, how many can't be edited anymore and how many rows matched no upload, followed by any errors (e.g. an invalid date or a column that was skipped).
What a CSV overwrites, and what it doesn't
- A filled-in cell replaces the current value of that field for that upload: the CSV is leading.
- An empty cell never changes anything. The field keeps its current value, also when the cell only holds spaces. This also means a CSV can't be used to clear a field.
- Keywords are replaced, not added to. When a row has keywords (or term ids or candidates, see the table below), they replace all of the upload's current keywords. When a row has no valid keywords at all (e.g. only term ids DeepMeta doesn't know, or a cell with only a "~"), the upload keeps its keywords, and the panel says so. A CSV never removes keywords without putting others in their place.
- The wildcard row applies to every upload in the batch. Be careful with keywords in that row: they replace the keywords of all uploads in the batch. The confirmation tells you how many uploads will have their keywords replaced.
- Values that are already the same are left alone, so applying the same CSV twice changes nothing the second time. Keywords count as the same regardless of upper or lower case.
- Only uploads that can still be edited are changed. Uploads that were already submitted or are in review are skipped and counted as "can't be edited anymore".
- Fields Getty doesn't let you edit for that batch type are skipped, with a message in the CSV panel (e.g. City for iStock batches).
- Everything else is untouched: fields without a column in the CSV, uploads without a matching row, the files themselves and their releases.
If you change your mind, a single Undo restores all values the CSV changed. An upload that has already been sent to the Getty ESP server meanwhile is simply updated again.
File names
Rows are matched by file name, regardless of upper or lower case. As at the Getty ESP site, a file name without an extension is read as a .jpg (photos and illustrations) or a .mov (videos), so "IMG_1234" matches "IMG_1234.jpg". Other extensions, like .jpeg or .mp4, need to be written in full. For an illustration, a row can name either the EPS file or its JPG raster.
Supported fields
Here's a table with currently supported fields:
| Field name in CSV | Field name in DeepMeta UI | Example |
|---|---|---|
| * | (wildcard: applied to all files) | |
| file name | c0035.mp4 | |
| created date | Created Date | 2002-3-27 (YYYY-MM-DD) or 3/27/2002 (MM/DD/YYYY) |
| title | Title | "Bluebells in a rainy forest" |
| description | Description | "Overview of a forest with colourful bluebells" |
| country | Country of Shoot | "Belgium" or "BE" |
| alternate id | Alternate ID | |
| city | City | |
| copyright | Copyright | |
| province/state | Province/State | |
| category | IPTC Category | |
| keywords | Keywords | "girl,piano,music,playing,young" |
| term ids | Keywords | "63067,63229" (Getty term ids, as already known to DeepMeta) |
| candidates | Keyword candidates | "old door,gate" |
| clip type | Clip Type | |
| subject | IPTC Subjects | "Agriculture" (name or code) |
| shot speed | Shot Speed | |
| number of people | Number of People | |
| poster timecode | Poster Timecode | 00:00:05:10 |
| brief code | Event ID | 123456 |
| event id | Event ID | 123456 |
The keywords, term ids and candidates columns belong together: when one of them has a value for an upload, together they make up that upload's new keywords. Keywords are looked up and matched to Getty terms, as when you type them in DeepMeta. In one cell, separate several keywords, term ids or candidates with "," or ";" (or "|"), and several subjects with "|".
Settings
Click the icon in the toolbar at the top of the DeepMeta window to open the Settings pane.


Keywording language
Getty allows you to set a Keywording Language independent from the language you use in the DeepMeta User Interface. If you select a Keywording Language different from US English, it is marked clearly, so you know you need to enter keywords in that language. Here's an example with French as Keywording Language:

Note that the Title and Description of your Uploads must always be in English.
Upload Region
Pick the location closest to where you are. This will result in the fastest uploads.
Default Country for uploads
If you almost always specify the same Country for your uploads, select Fixed and select the Country from the list. Use Last preselects the last country set for new uploads. None makes you explicitly select a country each time.
Maximum keyword terms
This number is the threshold above which DeepMeta will flag the upload as having an error. You'll almost always want to keep this at 50: the maximum officially allowed by Getty. Set it to a lower number if you want to constrain yourself to, e.g., max 30 terms per upload. It is also possible to set the number higher than 50, but this may trigger a rejection or remark from the inspector.
The golden rule remains: don't spam keywords and only select terms that are appropriate for the upload.
Support
The new Upload functionality in DeepMeta contains a large amount of new code. We've worked with our team of beta testers to make sure everything works as expected, but of course some bugs may still pop up. If you encounter any issues or have questions, don't hesitate to contact us. We're always happy to help!